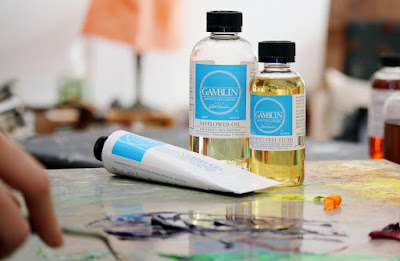
Gamblin's Solvent-Free Gel

If you are on a paint trip and painting for days at a time, your paint can get tacky and hard to work with. Or perhaps you are painting in cold weather and your paint has turned into putty. Some medium may be necessary. I used to have several of those little metal cups that clipped to my plein air palette so I could bring linseed oil, alkyds and other mediums along. They get messy fast! They fall off the palette. I tried to put the medium directly on my palette to keep things simple. Even bigger mess. So then I just got mad and gave up using mediums outdoors. Until I discovered Gamblin's Galkyd Gel. Squeeze it out like paint right on the palette. So easy!! Now Gamblin has a Solvent-Free Gel version that works just as well. Made from safflower oil and alkyd resin, Gamblin Solvent-Free Gel is non-toxic and contains no Gamsol or petroleum distillates. What does this mean? You can use the same medium in your studio without worry and take it outside for easy mixing. It will thin in hot weather but so will your oils. Gamblin recommends not using more than 25% by volume. In other words, don't think of this as a glazing tool. There are better mediums out there for glazing. Gamblin's Solvent-Free Gel is the perfect all around medium if you are trying to keep things simple - and simple is always better outside!
PanelPak Panel Carriers
I'm not always hiking for 2 miles to get to that perfect painting spot, but when I do, this wet panel carrier is a must! You can get two panels of the same size in each PanelPak. Each one is only 3/4 inch thick and adds only 3/4 inch to each dimension. I can take an 8x10 and a 9x12 one in my bag and add very little extra weight or dimension but still have 4 panels to paint in a day's hike! One note: you will need to carry two panels in each, even if you don't plan to paint on both. They sit in the carrier facing each other which will help protect your painting when it's back in your bag. Even if you're not planning to walk a great distance, these are still great for saving space in your backpack. They are also great for traveling by air. Have you ever tried to pack a wooden wet panel carrier in your carry on luggage? Yikes!! They come in a variety of sizes which you can find on their website: http://www.panelpak.com/panelpaks.html.
Wax Paper and Saran Wrap
What? These two things are just laying around in my kitchen! If you are on an extended trip or long workshop where you're painting several plein airs a day, that pile of panels is going to get big! Wet panel carriers are still a must have, but you don't need carriers for all of your paintings. I've come home with 20 plein airs from a trip. That would be 10 PanelPaks. With a little planning, you can select 2 or 3 sizes you'll use on the trip. You'll need at least one carrier for each of those sizes. Depending on where you travel and how thick you paint, your paintings could be dry to the touch in a few days. Once they are dry to the touch, place a piece of wax paper that you've cut to size between paintings and stack them. When you are done with the stack, use saran wrap to "shrink wrap" the stack so they stay in place. It's important the wrapping is tight so there's no shifting during travel as shifting is what will mess up your paintings. Once you get home, take it all apart. Thicker paint that wasn't dry could flatten but you can make touch ups once you're home. This is another great space saver if you are flying to your destination.


No comments:
Post a Comment